

.png) 手机流量卡
手机流量卡 免费领卡·号卡店铺
 关于本站
关于本站AI Agent 从零搭建实战教程

# AI Agent 从零搭建实战教程:从入门到上手的完整指南
前言
2024 年是 AI Agent 爆发的一年。从 AutoGPT 的横空出世,到 LangChain 生态的成熟,再到各大厂推出自己的 Agent 平台,AI Agent 正在从概念走向实战。但很多开发者在尝试搭建自己的 Agent 时,却发现市面上的教程要么过于理论,要么代码碎片化,难以落地。
本文将带你从零开始,手把手搭建一个完整的 AI Agent。不讲空话,只上干货。读完本文,你将掌握:
一、AI Agent 是什么?为什么现在这么火?
1.1 Agent 的定义
AI Agent(人工智能代理)是一个能够感知环境、做出决策、执行行动的智能系统。与传统的"一次性问答"不同,Agent 具备以下核心能力:
1.2 为什么 Agent 现在才爆发?
核心原因有三个:
1. 大模型能力突破:GPT-4、Claude 3 等模型具备了强大的推理和指令遵循能力 2. 工具链成熟:LangChain、LlamaIndex、AutoGen 等框架大幅降低了开发门槛 3. 成本下降:开源模型(Llama 3、Qwen 等)让私有化部署成为可能
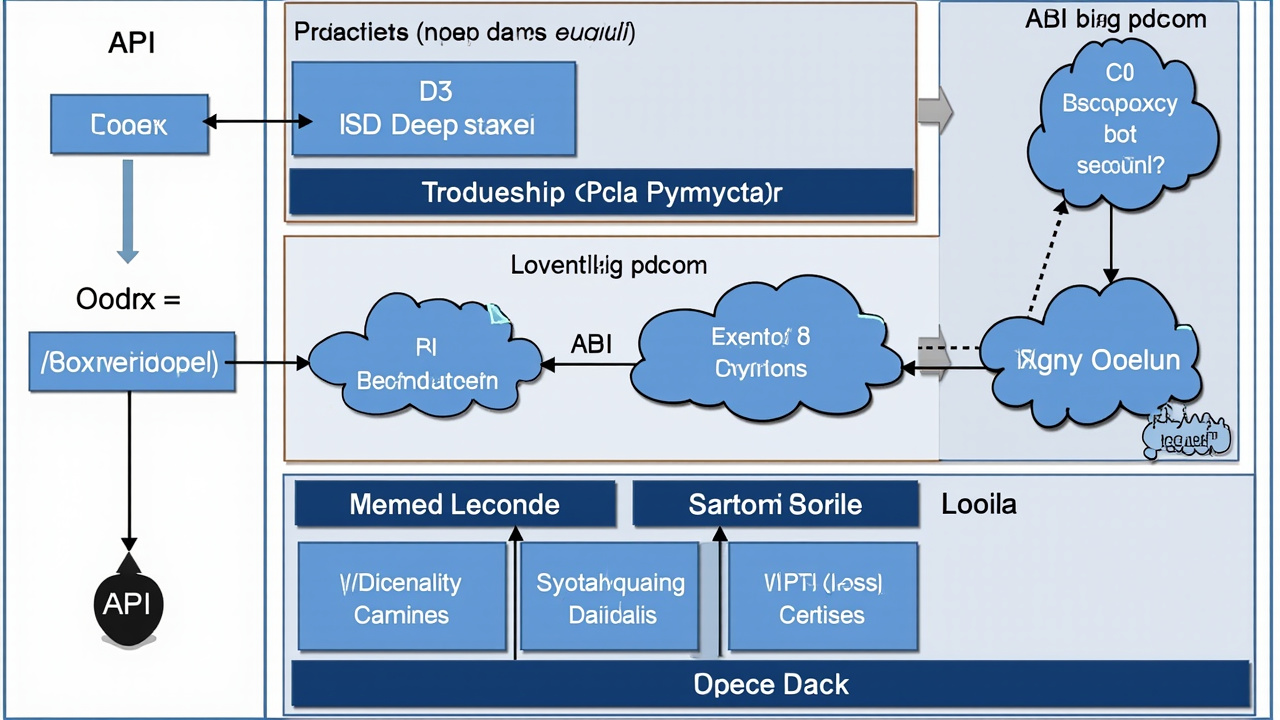
二、Agent 架构设计:核心组件解析
在动手写代码之前,我们需要理解 Agent 的标准架构。一个完整的 Agent 通常包含以下模块:
┌─────────────────────────────────────────┐
│              用户输入                    │
└─────────────┬───────────────────────────┘
              │
              ▼
┌─────────────────────────────────────────┐
│          感知层 (Perception)             │
│   - 文本理解                             │
│   - 意图识别                             │
│   - 实体抽取                             │
└─────────────┬───────────────────────────┘
              │
              ▼
┌─────────────────────────────────────────┐
│          大脑层 (Brain/LLM)              │
│   - 推理决策                             │
│   - 任务规划                             │
│   - 上下文管理                           │
└─────────────┬───────────────────────────┘
              │
              ▼
┌─────────────────────────────────────────┐
│          记忆层 (Memory)                 │
│   - 短期记忆(对话历史)                  │
│   - 长期记忆(向量数据库)                │
└─────────────┬───────────────────────────┘
              │
              ▼
┌─────────────────────────────────────────┐
│          工具层 (Tools)                  │
│   - API 调用                             │
│   - 代码执行                             │
│   - 文件操作                             │
└─────────────┬───────────────────────────┘
              │
              ▼
┌─────────────────────────────────────────┐
│          输出层 (Output)                 │
└─────────────────────────────────────────┘
2.1 记忆系统设计
记忆是 Agent 的核心能力之一。我们通常分为两种:
短期记忆:当前对话的上下文,通常存储在内存中。
class ShortTermMemory:
    def __init__(self, max_turns=10):
        self.messages = []
        self.max_turns = max_turns

    def add(self, role: str, content: str):
        self.messages.append({"role": role, "content": content})
        # 保持最近的 N 轮对话
        if len(self.messages) > self.max_turns * 2:
            self.messages = self.messages[-self.max_turns * 2:]

    def get_context(self):
        return self.messages.copy()

    def clear(self):
        self.messages = []
长期记忆:跨会话的持久化存储,通常使用向量数据库。
from chromadb import Client
from chromadb.config import Settingsclass LongTermMemory:
    def __init__(self, collection_name="agent_memory"):
        self.client = Client(Settings(
            chroma_db_impl="duckdb+parquet",
            persist_directory="./chroma_db"
        ))
        self.collection = self.client.get_or_create_collection(
            name=collection_name
        )

    def store(self, text: str, metadata: dict = None):
        # 使用简单的 hash 作为 ID
        doc_id = str(hash(text))
        self.collection.add(
            documents=[text],
            metadatas=[metadata or {}],
            ids=[doc_id]
        )

    def retrieve(self, query: str, n_results=5):
        results = self.collection.query(
            query_texts=[query],
            n_results=n_results
        )
        return results['documents'][0] if results['documents'] else []
2.2 工具系统设计
工具让 Agent 能够与外部世界交互。一个标准的工具定义如下:
from typing import Callable, Any from dataclasses import dataclass@dataclass class Tool: name: str description: str parameters: dict function: Callable def to_openai_format(self): return { "type": "function", "function": { "name": self.name, "description": self.description, "parameters": self.parameters } }
# 定义一个搜索工具 def web_search(query: str) -> str: """模拟网络搜索""" return f"搜索结果:{query} 相关信息..."
search_tool = Tool( name="web_search", description="搜索网络获取最新信息", parameters={ "type": "object", "properties": { "query": { "type": "string", "description": "搜索关键词" } }, "required": ["query"] }, function=web_search )
三、实战:从零搭建一个 Agent
3.1 环境准备
首先创建项目并安装依赖:
mkdir my-agent && cd my-agent
python -m venv venv
source venv/bin/activate  # Windows 用 venv\Scripts\activate
pip install openai langchain langchain-openai chromadb python-dotenv
创建 .env 文件配置 API Key:
OPENAI_API_KEY=your_api_key_here
# 如果使用国内模型,可以配置:
# DASHSCOPE_API_KEY=your_qwen_key
3.2 最简 Agent 实现
让我们先实现一个最简单的 Agent,理解核心流程:
import json from openai import OpenAIclass SimpleAgent: def __init__(self, api_key: str, model="gpt-4o-mini"): self.client = OpenAI(api_key=api_key) self.model = model self.messages = [] self.tools = [] def register_tool(self, tool): """注册工具""" self.tools.append(tool) def chat(self, user_input: str) -> str: """处理用户输入""" self.messages.append({"role": "user", "content": user_input}) # 调用模型 response = self.client.chat.completions.create( model=self.model, messages=self.messages, tools=[t.to_openai_format() for t in self.tools] if self.tools else None, tool_choice="auto" ) message = response.choices[0].message # 处理工具调用 if message.tool_calls: self.messages.append(message) for tool_call in message.tool_calls: # 执行工具 tool_name = tool_call.function.name tool_args = json.loads(tool_call.function.arguments) # 查找并执行工具 tool = next((t for t in self.tools if t.name == tool_name), None) if tool: result = tool.function(**tool_args) self.messages.append({ "role": "tool", "tool_call_id": tool_call.id, "content": str(result) }) # 递归调用,获取最终响应 return self.chat("") # 空输入,继续处理 # 普通回复 self.messages.append(message) return message.content
# 使用示例 if __name__ == "__main__": from dotenv import load_dotenv import os load_dotenv() agent = SimpleAgent(os.getenv("OPENAI_API_KEY")) agent.register_tool(search_tool) while True: user_input = input("你: ") if user_input.lower() in ["exit", "quit"]: break response = agent.chat(user_input) print(f"Agent: {response}")
这个最简 Agent 已经具备了:
- 多轮对话能力
- 工具调用能力
- 上下文保持
3.3 使用 LangChain 构建 Agent
LangChain 是目前最流行的 Agent 开发框架,提供了更高级的抽象:
from langchain_openai import ChatOpenAI from langchain.agents import create_tool_calling_agent, AgentExecutor from langchain.tools import Tool from langchain_core.prompts import ChatPromptTemplate from dotenv import load_dotenv import osload_dotenv()
# 定义工具 def get_weather(city: str) -> str: """获取天气信息""" # 实际应用中调用天气 API return f"{city}今天晴,温度 25°C"
def calculate(expression: str) -> str: """计算数学表达式""" try: return str(eval(expression)) except Exception as e: return f"计算错误:{e}"
tools = [ Tool( name="get_weather", func=get_weather, description="获取指定城市的天气信息,输入城市名称" ), Tool( name="calculate", func=calculate, description="计算数学表达式,输入数学表达式如 '2+3*4'" ) ]
# 创建 LLM llm = ChatOpenAI( model="gpt-4o-mini", temperature=0 )
# 创建 Prompt prompt = ChatPromptTemplate.from_messages([ ("system", "你是一个有用的助手,可以使用工具帮助用户。"), ("human", "{input}"), ("placeholder", "{agent_scratchpad}") ])
# 创建 Agent agent = create_tool_calling_agent(llm, tools, prompt) agent_executor = AgentExecutor(agent=agent, tools=tools, verbose=True)
# 运行 result = agent_executor.invoke({"input": "北京今天天气怎么样?顺便帮我算算 15 * 8"}) print(result['output'])
3.4 ReAct 模式:推理 + 行动
ReAct(Reasoning + Acting)是一种经典的 Agent 设计模式,让 Agent 先"想"再"做":
from typing import Literal from langchain_core.prompts import ChatPromptTemplate from langchain_openai import ChatOpenAIclass ReActAgent: def __init__(self, llm, tools): self.llm = llm self.tools = {t.name: t for t in tools} self.history = [] def think(self, observation: str) -> dict: """思考下一步行动""" prompt = f""" 你是一个遵循 ReAct 模式的智能助手。
可用工具: {self._format_tools()}
历史: {self._format_history()}
观察:{observation}
请按以下格式输出: Thought: [你的思考] Action: [工具名称] Action Input: [工具输入] 或者 Thought: [你的思考] Final Answer: [最终答案] """ response = self.llm.invoke(prompt) return self._parse_response(response.content) def act(self, action: str, action_input: str) -> str: """执行工具""" if action in self.tools: tool = self.tools[action] result = tool.func(action_input) self.history.append({ "action": action, "input": action_input, "result": result }) return result return f"未知工具:{action}" def run(self, query: str, max_steps=10): """运行 Agent""" observation = query for _ in range(max_steps): decision = self.think(observation) if "final_answer" in decision: return decision["final_answer"] observation = self.act( decision["action"], decision["action_input"] ) return "达到最大步数限制" def _format_tools(self): return "\n".join([ f"- {name}: {t.description}" for name, t in self.tools.items() ]) def _format_history(self): if not self.history: return "无" return "\n".join([ f"执行 {h['action']}({h['input']}) -> {h['result']}" for h in self.history ]) def _parse_response(self, response: str): if "Final Answer:" in response: answer = response.split("Final Answer:")[-1].strip() return {"final_answer": answer} action = "" action_input = "" for line in response.split("\n"): if line.startswith("Action:"): action = line.replace("Action:", "").strip() elif line.startswith("Action Input:"): action_input = line.replace("Action Input:", "").strip() return {"action": action, "action_input": action_input}
四、进阶:多 Agent 协作
当任务复杂时,单个 Agent 可能力不从心。这时可以构建多 Agent 系统,让多个"专家"协作:
from typing import List, Dict from dataclasses import dataclass@dataclass class Task: description: str assigned_to: str = None result: str = None
class MultiAgentSystem: def __init__(self): self.agents: Dict[str, SimpleAgent] = {} self.task_queue: List[Task] = [] def register_agent(self, name: str, role: str, agent: SimpleAgent): """注册 Agent""" self.agents[name] = { "agent": agent, "role": role } def create_task(self, description: str): """创建任务""" self.task_queue.append(Task(description=description)) def assign_tasks(self): """分配任务给合适的 Agent""" for task in self.task_queue: if not task.assigned_to: # 简单的路由逻辑 if "代码" in task.description or "编程" in task.description: task.assigned_to = "coder" elif "翻译" in task.description: task.assigned_to = "translator" else: task.assigned_to = "general" def execute(self): """执行所有任务""" self.assign_tasks() for task in self.task_queue: if task.assigned_to and task.assigned_to in self.agents: agent_info = self.agents[task.assigned_to] task.result = agent_info["agent"].chat(task.description) return [t.result for t in self.task_queue if t.result]
五、部署与优化
5.1 成本优化
使用大模型的成本可能很高,以下是几个优化策略:
1. 使用更便宜的模型处理简单任务
def smart_route(query: str) -> str:
    """智能路由:简单任务用小模型"""
    simple_keywords = ["你好", "谢谢", "再见", "是什么"]
    if any(kw in query for kw in simple_keywords):
        return "gpt-3.5-turbo"
    return "gpt-4o-mini"
2. 缓存常见问题
from functools import lru_cacheclass CachedAgent:
    def __init__(self, agent):
        self.agent = agent
        self.cache = {}

    def chat(self, user_input: str) -> str:
        # 简化后的缓存 key
        cache_key = hash(user_input)
        if cache_key in self.cache:
            return self.cache[cache_key]

        result = self.agent.chat(user_input)
        self.cache[cache_key] = result
        return result
3. 流式输出减少等待感
def chat_stream(agent, user_input: str):
    """流式输出"""
    for chunk in agent.chat_stream(user_input):
        yield chunk
5.2 安全性考虑
Agent 可以执行代码和调用 API,安全性至关重要:
# 工具执行沙箱
import subprocess
import tempfiledef safe_execute(code: str, timeout=5) -> str:
    """安全执行 Python 代码"""
    with tempfile.NamedTemporaryFile(mode='w', suffix='.py', delete=False) as f:
        f.write(code)
        temp_file = f.name

    try:
        result = subprocess.run(
            ['python', temp_file],
            capture_output=True,
            text=True,
            timeout=timeout
        )
        return result.stdout or result.stderr
    except subprocess.TimeoutExpired:
        return "执行超时"
    finally:
        os.unlink(temp_file)
六、实战案例:构建一个智能助手
让我们把前面学到的知识整合起来,构建一个实用的智能助手:
import os from dotenv import load_dotenv from openai import OpenAI import jsonclass SmartAssistant: def __init__(self): load_dotenv() self.client = OpenAI(api_key=os.getenv("OPENAI_API_KEY")) self.conversation_history = [] self.tools = self._setup_tools() def _setup_tools(self): """配置工具""" return [ { "type": "function", "function": { "name": "get_current_time", "description": "获取当前时间", "parameters": {"type": "object", "properties": {}} } }, { "type": "function", "function": { "name": "calculate", "description": "计算数学表达式", "parameters": { "type": "object", "properties": { "expression": {"type": "string", "description": "数学表达式"} }, "required": ["expression"] } } } ] def _execute_tool(self, tool_name: str, args: dict) -> str: """执行工具""" if tool_name == "get_current_time": from datetime import datetime return datetime.now().strftime("%Y-%m-%d %H:%M:%S") elif tool_name == "calculate": try: # 安全计算 allowed = set("0123456789+-*/(). ") if all(c in allowed for c in args["expression"]): return str(eval(args["expression"])) return "非法表达式" except Exception as e: return f"计算错误:{e}" return "未知工具" def chat(self, user_input: str) -> str: """处理用户输入""" self.conversation_history.append({ "role": "user", "content": user_input }) response = self.client.chat.completions.create( model="gpt-4o-mini", messages=self.conversation_history, tools=self.tools, tool_choice="auto" ) message = response.choices[0].message # 处理工具调用 if message.tool_calls: self.conversation_history.append(message) for tool_call in message.tool_calls: result = self._execute_tool( tool_call.function.name, json.loads(tool_call.function.arguments) ) self.conversation_history.append({ "role": "tool", "tool_call_id": tool_call.id, "content": result }) # 获取最终回复 final_response = self.client.chat.completions.create( model="gpt-4o-mini", messages=self.conversation_history ) message = final_response.choices[0].message self.conversation_history.append(message) return message.content def run(self): """运行交互循环""" print("智能助手已启动,输入 'exit' 退出") while True: user_input = input("\n你: ").strip() if user_input.lower() in ["exit", "quit"]: print("再见!") break response = self.chat(user_input) print(f"\n助手: {response}")
if __name__ == "__main__": assistant = SmartAssistant() assistant.run()
七、总结与展望
7.1 核心要点回顾
1. Agent = LLM + 记忆 + 工具 + 规划:理解这四个核心组件 2. 从简单开始:先实现最小可用版本,再逐步添加功能 3. 安全性第一:Agent 有能力执行操作,必须做好权限控制 4. 成本优化:合理使用缓存、路由、流式输出
7.2 推荐学习路径
1. 入门:掌握 LangChain 基础,实现简单的工具调用 2. 进阶:学习 ReAct 模式,实现多步推理 3. 高级:探索多 Agent 协作,如 AutoGen、CrewAI 4. 实战:将 Agent 集成到实际项目中,解决真实问题
7.3 有价值的资源
AI Agent 是一个快速发展的领域。本文的代码和思路只是一个起点,真正的能力提升需要在实战中不断迭代。记住:最好的学习方式是动手做一个真正有用的 Agent。
祝你搭建愉快!🚀
本文链接:https://www.kkkliao.cn/?id=661 转载需授权!
版权声明:本文由廖万里的博客发布,如需转载请注明出处。