

.png) 手机流量卡
手机流量卡 免费领卡·号卡店铺
 关于本站
关于本站AI Agent 开发实战教程:从原理到 MCP 协议应用

AI Agent 正在重新定义我们与人工智能交互的方式。从简单的问答机器人到能够自主规划、执行复杂任务的智能体,Agent 技术正在经历爆发式增长。本文将深入讲解 AI Agent 的核心原理,并重点介绍 Anthropic 推出的 MCP(Model Context Protocol)协议,带你从零构建一个生产级 Agent。
一、核心概念:什么是 AI Agent
AI Agent(人工智能代理)是一种能够感知环境、自主决策并采取行动以实现目标的智能系统。与传统的 AI 模型不同,Agent 具备以下核心特征:
1. 自主性(Autonomy)
Agent 能够在最少人工干预的情况下独立完成任务。它可以根据环境变化自主调整策略,无需每一步都等待用户指令。
2. 反应性(Reactivity)
Agent 能够感知环境并及时响应变化。当遇到意外情况时,它能快速调整行为,而不是机械地执行预设脚本。
3. 主动性(Proactivity)
Agent 不仅是被动响应,还能主动规划并采取行动。它会根据目标自主生成任务序列,并按最优路径执行。
4. 社交能力(Social Ability)
高级 Agent 能够与人类或其他 Agent 协作,通过自然语言或结构化协议进行交互。
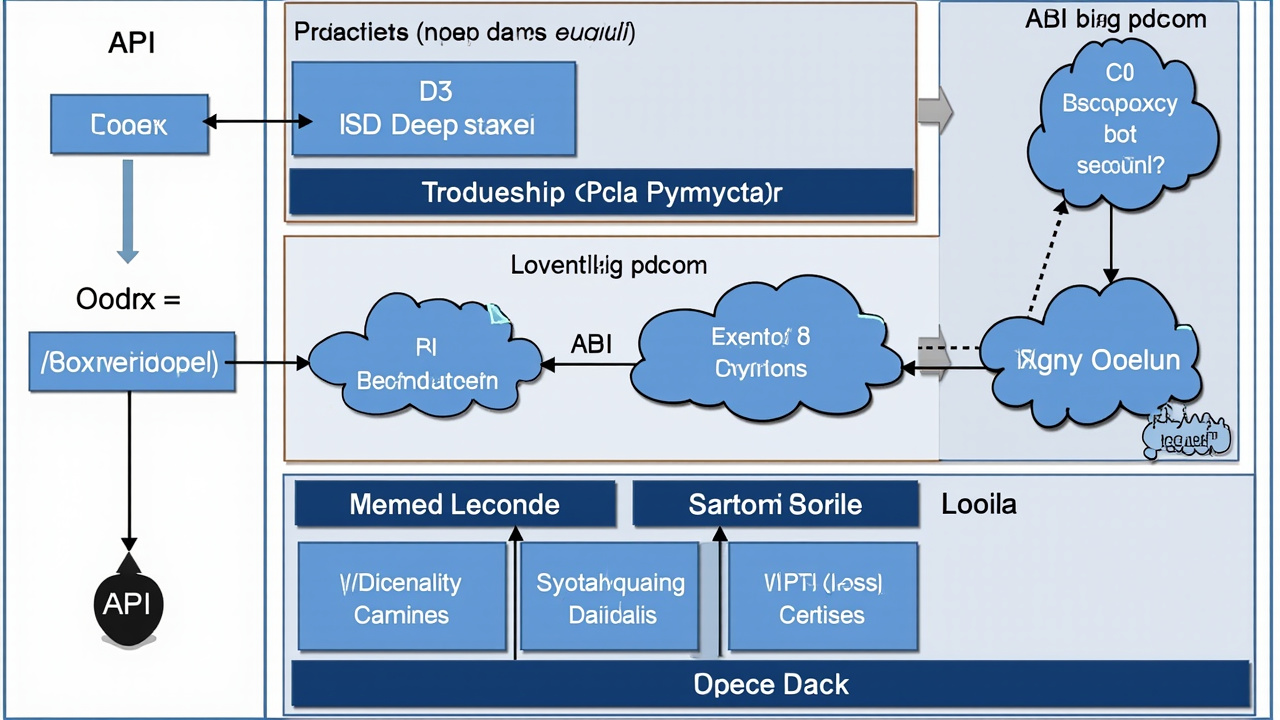
Agent 的核心架构
一个典型的 AI Agent 系统包含以下组件:
# Agent 核心架构示意
class AIAgent:
    def __init__(self):
        self.memory = Memory()        # 记忆系统:存储历史交互和知识
        self.planner = Planner()      # 规划器:分解任务、制定执行计划
        self.executor = Executor()    # 执行器:调用工具、执行动作
        self.tools = ToolSet()        # 工具集:外部能力的集合
        self.llm = LLM()              # 大模型:推理和决策的核心引擎

    def run(self, user_input):
        # 1. 理解用户意图
        intent = self.llm.understand(user_input, self.memory)

        # 2. 制定执行计划
        plan = self.planner.create_plan(intent)

        # 3. 逐步执行任务
        for step in plan.steps:
            result = self.executor.execute(step, self.tools)
            self.memory.store(result)

        # 4. 生成最终回复
        return self.llm.generate_response(self.memory)
二、MCP 协议:AI Agent 的标准化接口
MCP(Model Context Protocol)是 Anthropic 在 2024 年推出的开放协议,旨在解决 AI Agent 与外部工具、数据源之间的连接问题。它被誉为"AI 领域的 USB 接口"——一个统一的标准化连接方案。
为什么需要 MCP?
在 MCP 出现之前,每个 AI 应用都需要:
- 为每个数据源单独编写集成代码
- 为每个工具维护不同的 API 调用方式
- 每次切换模型时重新适配接口
这导致了严重的碎片化问题。MCP 通过提供统一协议,让开发者只需写一次集成,就能在任何支持 MCP 的 AI 应用中使用。
MCP 的核心概念
1. Resources(资源)
只读的数据源,如文件、数据库记录、API 响应等。Agent 可以查询但不能修改。
2. Prompts(提示词模板)
预定义的提示词模板,帮助用户快速发起特定类型的交互。
3. Tools(工具)
可执行的操作,如发送邮件、查询数据库、调用 API 等。Agent 可以主动调用这些工具来完成任务。
# MCP Server 示例:实现一个简单的工具服务器
from mcp.server import Server
from mcp.types import Tool, TextContent

# 创建 MCP 服务器实例
server = Server("my-tools-server")

# 定义可用工具
@server.list_tools()
async def list_tools():
    return [
        Tool(
            name="get_weather",
            description="获取指定城市的天气信息",
            inputSchema={
                "type": "object",
                "properties": {
                    "city": {"type": "string", "description": "城市名称"}
                },
                "required": ["city"]
            }
        ),
        Tool(
            name="send_email",
            description="发送邮件给指定收件人",
            inputSchema={
                "type": "object",
                "properties": {
                    "to": {"type": "string", "description": "收件人邮箱"},
                    "subject": {"type": "string", "description": "邮件主题"},
                    "body": {"type": "string", "description": "邮件内容"}
                },
                "required": ["to", "subject", "body"]
            }
        )
    ]

# 实现工具调用逻辑
@server.call_tool()
async def call_tool(name: str, arguments: dict):
    if name == "get_weather":
        city = arguments["city"]
        # 实际应用中调用天气 API
        weather_info = f"{city}今天晴,温度22°C"
        return [TextContent(type="text", text=weather_info)]

    elif name == "send_email":
        # 实际应用中实现邮件发送
        return [TextContent(type="text", text=f"邮件已发送至 {arguments['to']}")]

# 启动服务器
if __name__ == "__main__":
    server.run()
MCP 客户端集成
# MCP 客户端示例:连接到 MCP 服务器并使用工具
from mcp import ClientSession, StdioServerParameters
from mcp.client.stdio import stdio_client
from anthropic import Anthropic

class MCPAgent:
    def __init__(self):
        self.anthropic = Anthropic()
        self.session = None
        self.available_tools = []

    async def connect_to_server(self, server_script: str):
        """连接到 MCP 服务器"""
        server_params = StdioServerParameters(
            command="python",
            args=[server_script]
        )

        async with stdio_client(server_params) as (read, write):
            async with ClientSession(read, write) as session:
                self.session = session
                await session.initialize()

                # 获取可用工具列表
                tools_result = await session.list_tools()
                self.available_tools = tools_result.tools
                print(f"已连接,可用工具:{[t.name for t in self.available_tools]}")

    async def chat(self, user_message: str):
        """与 Agent 对话"""
        # 将 MCP 工具转换为 Claude 可识别的格式
        claude_tools = [
            {
                "name": tool.name,
                "description": tool.description,
                "input_schema": tool.inputSchema
            }
            for tool in self.available_tools
        ]

        response = self.anthropic.messages.create(
            model="claude-sonnet-4-20250514",
            max_tokens=4096,
            messages=[{"role": "user", "content": user_message}],
            tools=claude_tools
        )

        # 处理工具调用
        while response.stop_reason == "tool_use":
            tool_calls = [block for block in response.content if block.type == "tool_use"]

            # 执行工具调用
            tool_results = []
            for tool_call in tool_calls:
                result = await self.session.call_tool(
                    tool_call.name,
                    tool_call.input
                )
                tool_results.append({
                    "type": "tool_result",
                    "tool_use_id": tool_call.id,
                    "content": result.content[0].text
                })

            # 继续对话
            response = self.anthropic.messages.create(
                model="claude-sonnet-4-20250514",
                max_tokens=4096,
                messages=[
                    {"role": "user", "content": user_message},
                    {"role": "assistant", "content": response.content},
                    {"role": "user", "content": tool_results}
                ],
                tools=claude_tools
            )

        return response.content[0].text

# 使用示例
async def main():
    agent = MCPAgent()
    await agent.connect_to_server("my_tools_server.py")

    response = await agent.chat("帮我查询北京的天气")
    print(response)

import asyncio
asyncio.run(main())
三、实战案例:构建一个智能代码助手
让我们构建一个能够自动读取代码、分析问题并提供修复建议的 AI Agent。
步骤 1:定义工具集
# code_assistant_tools.py
import os
import subprocess
from mcp.server import Server
from mcp.types import Tool, TextContent

server = Server("code-assistant")
CODEBASE_PATH = "./my_project"  # 你的代码库路径

@server.list_tools()
async def list_tools():
    return [
        Tool(
            name="read_file",
            description="读取指定路径的文件内容",
            inputSchema={
                "type": "object",
                "properties": {
                    "path": {"type": "string", "description": "文件路径(相对于项目根目录)"}
                },
                "required": ["path"]
            }
        ),
        Tool(
            name="list_files",
            description="列出指定目录下的所有文件",
            inputSchema={
                "type": "object",
                "properties": {
                    "directory": {"type": "string", "description": "目录路径"}
                },
                "required": ["directory"]
            }
        ),
        Tool(
            name="search_code",
            description="在代码库中搜索包含指定关键词的文件",
            inputSchema={
                "type": "object",
                "properties": {
                    "keyword": {"type": "string", "description": "搜索关键词"}
                },
                "required": ["keyword"]
            }
        ),
        Tool(
            name="run_tests",
            description="运行项目的测试套件",
            inputSchema={"type": "object", "properties": {}}
        )
    ]

@server.call_tool()
async def call_tool(name: str, arguments: dict):
    if name == "read_file":
        file_path = os.path.join(CODEBASE_PATH, arguments["path"])
        try:
            with open(file_path, 'r', encoding='utf-8') as f:
                content = f.read()
            return [TextContent(type="text", text=content[:5000])]  # 限制长度
        except Exception as e:
            return [TextContent(type="text", text=f"读取失败: {str(e)}")]

    elif name == "list_files":
        directory = os.path.join(CODEBASE_PATH, arguments.get("directory", "."))
        try:
            files = []
            for root, dirs, filenames in os.walk(directory):
                for filename in filenames:
                    rel_path = os.path.relpath(os.path.join(root, filename), CODEBASE_PATH)
                    files.append(rel_path)
            return [TextContent(type="text", text="\n".join(files[:50]))]
        except Exception as e:
            return [TextContent(type="text", text=f"列出失败: {str(e)}")]

    elif name == "search_code":
        keyword = arguments["keyword"]
        results = []
        for root, dirs, files in os.walk(CODEBASE_PATH):
            for file in files:
                if file.endswith(('.py', '.js', '.ts', '.java')):
                    file_path = os.path.join(root, file)
                    try:
                        with open(file_path, 'r', encoding='utf-8') as f:
                            content = f.read()
                            if keyword in content:
                                rel_path = os.path.relpath(file_path, CODEBASE_PATH)
                                results.append(rel_path)
                    except:
                        pass
        return [TextContent(type="text", text=f"找到 {len(results)} 个文件:\n" + "\n".join(results[:20]))]

    elif name == "run_tests":
        try:
            result = subprocess.run(
                ['python', '-m', 'pytest', CODEBASE_PATH, '-v'],
                capture_output=True,
                text=True,
                timeout=60
            )
            return [TextContent(type="text", text=result.stdout + result.stderr)]
        except Exception as e:
            return [TextContent(type="text", text=f"测试执行失败: {str(e)}")]

if __name__ == "__main__":
    server.run()
步骤 2:实现 Agent 逻辑
# code_agent.py
import asyncio
from mcp import ClientSession, StdioServerParameters
from mcp.client.stdio import stdio_client
from anthropic import Anthropic

class CodeAssistantAgent:
    def __init__(self):
        self.client = Anthropic()
        self.session = None
        self.conversation_history = []

    async def start(self, server_script: str):
        """启动 Agent 并连接工具服务器"""
        server_params = StdioServerParameters(
            command="python",
            args=[server_script]
        )

        self.read, self.write = await stdio_client(server_params).__aenter__()
        self.session = ClientSession(self.read, self.write)
        await self.session.__aenter__()
        await self.session.initialize()

        # 获取工具列表
        tools_result = await self.session.list_tools()
        self.tools = tools_result.tools
        print(f"✓ 已加载 {len(self.tools)} 个工具")

    async def analyze_codebase(self, query: str):
        """分析代码库并回答问题"""
        self.conversation_history.append({
            "role": "user",
            "content": query
        })

        # 转换工具格式
        claude_tools = [{
            "name": t.name,
            "description": t.description,
            "input_schema": t.inputSchema
        } for t in self.tools]

        while True:
            response = self.client.messages.create(
                model="claude-sonnet-4-20250514",
                max_tokens=4096,
                system="你是一个专业的代码助手,可以帮助用户分析代码、查找问题、提供优化建议。请主动使用工具来获取信息,给出详细且有见地的回答。",
                messages=self.conversation_history,
                tools=claude_tools
            )

            # 检查是否需要调用工具
            if response.stop_reason != "tool_use":
                # 提取最终回复
                final_text = ""
                for block in response.content:
                    if hasattr(block, "text"):
                        final_text += block.text

                self.conversation_history.append({
                    "role": "assistant",
                    "content": response.content
                })
                return final_text

            # 处理工具调用
            tool_results = []
            assistant_content = []

            for block in response.content:
                assistant_content.append(block)

                if block.type == "tool_use":
                    print(f"→ 调用工具: {block.name}")
                    print(f"  参数: {block.input}")

                    result = await self.session.call_tool(block.name, block.input)
                    tool_output = result.content[0].text

                    print(f"← 结果: {tool_output[:100]}...")

                    tool_results.append({
                        "type": "tool_result",
                        "tool_use_id": block.id,
                        "content": tool_output
                    })

            # 更新对话历史
            self.conversation_history.append({
                "role": "assistant",
                "content": assistant_content
            })
            self.conversation_history.append({
                "role": "user",
                "content": tool_results
            })

# 使用示例
async def main():
    agent = CodeAssistantAgent()
    await agent.start("code_assistant_tools.py")

    # 示例对话
    print("\n" + "="*50)
    print("Agent: 你好!我是你的代码助手。请问有什么可以帮你的?")
    print("="*50 + "\n")

    # 分析代码库结构
    result = await agent.analyze_codebase("请帮我分析这个项目的结构,并告诉我主要的模块有哪些")
    print(f"\nAgent: {result}")

    # 查找特定功能
    result = await agent.analyze_codebase("项目中有处理用户认证的代码吗?请帮我找到并分析")
    print(f"\nAgent: {result}")

if __name__ == "__main__":
    asyncio.run(main())
步骤 3:运行效果演示
✓ 已加载 4 个工具

==================================================
Agent: 你好!我是你的代码助手。请问有什么可以帮你的?
==================================================

→ 调用工具: list_files
  参数: {'directory': '.'}
← 结果: src/main.py
src/utils/auth.py
src/models/user.py...

Agent: 根据分析,这个项目的结构如下:

**核心模块:**
1.  - 应用入口
2.  - 认证工具
3.  - 用户模型

**建议优化:**
- 考虑将认证逻辑拆分为独立服务
- 添加类型注解以提高代码可读性
- 建议增加单元测试覆盖率
四、MCP 的生态与未来
官方预置服务器
Anthropic 和社区已经提供了大量开箱即用的 MCP 服务器:
- Filesystem - 文件系统读写
- PostgreSQL/SQLite - 数据库查询
- GitHub - 仓库和 Issues 管理
- Google Drive - 云存储集成
- Slack - 团队协作工具
- Puppeteer - 浏览器自动化
WebMCP:下一代 Web-Agent 连接范式
最新的发展趋势是将 MCP 扩展到 Web 环境。WebMCP 允许:
- 浏览器直接作为 MCP 客户端
- 网页内容作为 Resources 暴露给 Agent
- 前端交互转化为 Tools 调用
这意味着 AI Agent 可以直接操作网页,实现真正的自主浏览和交互。
总结
AI Agent 正在从概念走向实用,而 MCP 协议的推出为 Agent 生态带来了标准化的连接方案。通过本文的学习,你应该掌握了:
- Agent 核心架构 - Memory、Planner、Executor、Tools 四大组件如何协同工作
- MCP 协议原理 - Resources、Prompts、Tools 三大概念及其应用场景
- 实战开发能力 - 如何从零构建一个具备工具调用能力的智能 Agent
未来,随着更多模型和服务支持 MCP 协议,AI Agent 的能力边界将持续扩展。现在正是入局的最佳时机——掌握 Agent 开发,就是掌握了 AI 应用开发的未来。
延伸阅读:
本文链接:https://www.kkkliao.cn/?id=979 转载需授权!
版权声明:本文由廖万里的博客发布,如需转载请注明出处。